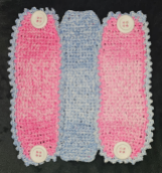
Collapsible and Foldable Storage Basket in any size. Easy!!
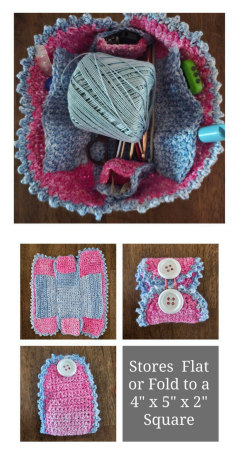
Folds to 4" x 5" x 2"
Expands to 3 ½" x 7" x 3 ½"
Materials Needed
The yarn type color and amount will depend upon the size of the basket you decide to make. The general items you will need are 4 large buttons, 2 hair ties, sewing needle and Thread. Darning needle and scissors.
Common Abbreviations
Chain (ch)
Slip Stitch (sl st)
Single Crochet (sc)
Together (tog)
Alteration
This versatile Button Basket can be stored away flat until you need it. The basket can also be made with any yarn and any hook.
You can also choose your own size by simply using your yarn and hook gauge.
To make the basket wider or smaller, simply add or subtract sts. To make the basket longer just add more rows. Note: determine your width 1st. Since the width is crucial to determining the length because part of the length will be the side.
I will need to start at the narrow end that is 4 sts shorter than my final width. I then started with a measurement of 3" for my width. My gauge said I would need to ch 4 for each inch. I determined that I would need a total of 12 plus 1 turning ch for a total of 13 chs.
This pattern starts out with 4 increases to get to my total of 12 chs. So I Took 4 from 13 for a starting ch total of 9. Bottom - Make 1
With yarn and size G hook, ch 9.
or
Your desired Width in chs - 4 chs = _________ chs.
Use your gauge or a ruler to determine the number of beg chs.
Row 1. Sc in the 2nd ch from the hook and in each ch across. Ch 1 and turn. (8, your number here __________sc made.)
Row 2. Make 2 sc in the 1st st. Sc in each st across until the last st. Make 2 sc in the last st. Ch 1 and turn. (10, your number here __________sc made.)
Row 3. Sc in each st across. Ch 1 and turn. (10, your number here __________sc made.)
Row 4. Make 2 sc in the 1st st. Sc in each st across until the last st. Make 2 sc in the last st. Ch 1 and turn.(12, your number here __________sc made.)
Row 5. Sc in each st across. Ch 1 and turn. (12, your number here __________sc made.) Rep row 5 until the piece is approximately 10", your length here minus the width, __________long.
Tapering
Row 1. Sc the 1st 2 sts tog. Sc in each st until the last st. Sc the last 2 sts tog. Ch 1 and turn. (10, your number here __________sc made.)
Row 2. Sc in each of the 10, your number here __________ sts across. Ch 1 and turn.
Row 3. Sc the 1st 2 sts tog. Sc in each st until the last st. Sc the last 2 sts tog. Ch 1 and turn. (8, your number here __________ sc made.)
Row 3. Sc in each of the 8, your number here __________ sts across.
Finishing Bottom and Sides
Bottom
Rnd 1. Ch 1 and turn. ** Make 3 sc in the corner. Make an odd number of sc down the narrow side. Your number here __________Make 3 sc in the corner. Make an odd number of sts down the long side. Your number here __________ * Rep from ** to *. End with a sl st in to the 1st sc made.
For the bottom end here.

Rnd 2 - Side pieces only if desired. Join contrasting color in any corner st. Ch 1 and ** make sc, picot and Sc in corner st. Picot in the next st. (Sc in the next st. Picot in the next st) across the row until the next corner.* Rep from ** to * around. Join to the 1st sc made with a sl st. End off and weave in the end. Rep for the opposite side.
End off and weave in the end. Set aside until all pieces are made.
Assembling
Measure the actual width of the bottom piece. Mine is about 3". Now divide your width in half. Mine is about 1 ½"
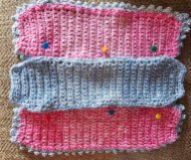
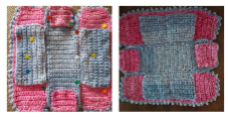
Place the bottom piece over the side pieces, with wrong sides facing and an overlap of about ¼". Measure down the ½ the width of your bottom piece and pin tog in all 4 corners. Now pin tog in the center. Sew the piece together on both sides between pins.
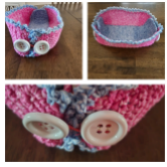
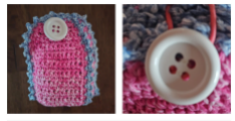
Flip the piece over and sew 4 buttons to the side ends as shown below.
Closing with hair ties.

Optional Pockets
Make pockets That are the width less on each side of the side and about 2 rows short of your width measurement. The small end pockets can be the size of the small end but should be About 1" short of your width measurement.
Sew the pockets down. Sew down the middle of the side pockets if desired.
Button sides and fill.
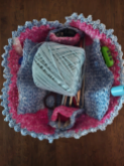
When finished open and lay flat. Fold in thirds and then in half with buttons facing out. Use hair ties to keep closed.


Comments
Post a Comment